
0
Owner's of the 3M Computer Monitor 3M MicroTouch Display gave it a score of 0 out of 5. Here's how the scores stacked up:


12 3M™ MicroTouch™ Display C1500SS Installation Guide
3M Touch Systems Proprietary Information
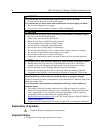
• RS-232 serial communication cable (or USB cable if applicable)
• Optional AC/DC power supply (12V DC output)
• AC power cable
• CD with touch software, documentation, and utilities
• Hardware kit (includes mounting brackets, screws, washers)
Mounting the C1500SS Display
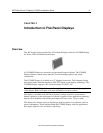
The C1500SS Display is designed to fit any type of enclosure. All C1500SS Displays are
encased in rugged metal instead of plastic, making them easy to integrate.
The display has a bezel already mounted to act as an interface with a front mounting
surface.
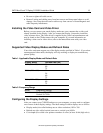
The C1500SS Display includes a hardware accessory kit for mounting the unit into an
enclosure. The C1500SS hardware accessory kit includes two brackets, washers, and
screws. The mounting holes are located on the sides of the display and are threaded to an
M4 thread.
You can attach the brackets to the edges of the chassis. The brackets are slotted, allowing
the chassis to slide in and out. You can also rotate the brackets to various positions.
The unit has a 75mm VESA mounting pattern on the back case to allow for arm mount
capability.
Note: Do not mount the chassis unit directly from the rear of the cover. Always use the
holes and brackets provided. Do not drill additional holes in the unit to mount brackets in
other locations.
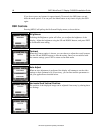
Access to the Video Controls
The controls for adjusting the video display are located on the back of the C1500SS
Display. These buttons let you display the on-screen menu and adjust the phase, image
position, contrast, and brightness. Make sure you will be able to access the video controls
once the C1500SS Display is installed.
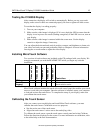
Clearance and Ventilation
Leave at least two inches of clearance space behind the C1500SS Display for proper
ventilation. Units have vent holes at the top and bottom on the back of the chassis --
ensure these holes are not blocked during installation. Always maintain adequate
ventilation to protect the display from overheating and to ensure reliable and continued
operation. Refer to the published specifications for the maximum and minimum operating
temperature and humidity conditions.
Securing and Routing System Cables
You must be sure to secure all cable connections. Shaking and vibration, especially
during shipment, may dislodge components that are improperly connected.


Find Your Products By Category
- Computer Equipment
- Portable Media
- Photography
- Car Audio and Video
- TV and Video
- Household Appliance
- Automotive
- Communications
- Kitchen Appliance
- Laundry Appliance
- Home Audio
- Lawn and Garden
- Power Tools
- Musical Instruments & Equipment
- Baby
- Personal Care
- Video Game
- Marine Equipment
- Fitness & Sports
- Outdoor Cooking
- Cell Phone
Please Login
