
0
Owner's of the Adesso Photo Scanner EZSCAN 1000 gave it a score of 0 out of 5. Here's how the scores stacked up:

1
5
2
6
10
3
7
11
9
4
8
12
Model: EZScan 1000
Processor: PC: IBM Compatible PC with Pentium III or higher
Mac: PPC G4, PPC G5 Intel
Memory: 512 MB RAM and 500 MB Free HDD Space
Operating System: Windows
®
7, Windows
®
Vista, Windows
®
XP & Windows
®
2000
Mac
®
10.4, 10.5 & 10.6
Connectivity Interface: USB 2.0 Port
Others: High Color Graphic Card (VGA or higher)
CD-ROM Drive (for Software Installation)
SPECIFICATIONS
Scanning Type: Image Capture CMOS
Optical Resolution: 1800 DPI
Software Interpolation: 3600 DPI x 3600 DPI (5-Megapixels)
Color Depth: 24 bit/pixel
Preview/ Scan Speed: Approx 8 sec (600 DPI)
Action Button: Transparent & Negative Scan
Scan Method: Single Pass
Protocols: TWAIN Compliant
Interface: USB 2.0 Only
CONTENTS
Using Mounted Slide Holder
To scan 35mm mounted slides (max 4 slides):
Insert mounted slides into slots with emulsion (non-glossy) side down.
There are arrows and illustrations on the frame of each slot. Please
follow illustrations to insert mounted slides.
Using Filmstrip Holder
To scan 35mm filmstrips (max 6 frames):
Open filmstrip holder and place filmstrip in the film holder with emulsion,
(non-glossy) side down. Then snap the film holder cover closed.
Insert Film Holder into Scanner
Insert the film holder into the scanner through dust cover slots. The film
holder can be inserted from either side. The film holder will index at each
frame using the notches on its side rails.
1. To ensure film is scanned properly, verify that your slide/film holder is
inserted correctly (see page 9).
2. The film holder should be inserted into the scanner smoothly. Do not push
the film holder hard or use extreme force, this will damage scanner.
3. When film holder is inserted into scanner it will stop at index positions,
before preforming scan gently push and pull the film holder to make sure
the film holder has correctly landed in an index position.
Attention
Before performing the driver/software installation ensure your
scanner is NOT CONNECTED to your computer.
1. Insert the Software CD into your CD-ROM drive.
Note: If the Installation Wizard does not start or display automatically,
please double click “install.exe” from the root of CD-ROM.
2. When the Installation Wizard window is displayed click on “Install
the Software” button.
3. Next, click on the “Install” button to start the installation.
4. Then click on the “Next” button in the window that appears.
5. If there is a message asking you to install device software, click the
“Install” button.
6. Click “Install this driver and software anyway” (Windows 7 or Vista) or
“Continue Anyway” (Windows XP or 2000) when Windows
®
message is
displayed during the installation process.
7. Next a window will be displayed asking you to connect scanner. Plug the
smaller end of the included mini USB cable to the back of the scanner and
plug the bigger end of the USB cable to the USB port on your computer.
8. When your computer recognizes scanner, return to the orignal window
that asked you to connect scanner and click “OK”.
9. Click “Finish” to complete the driver installation.
10. Restart your computer after the installation is completed.
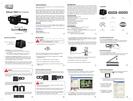
With the Adesso Film Scanner quickly and easily convert old filmstrips and slides to
digital images for instant sharing or digital storage. This film scanner conveniently
connects to your computer via USB connection and is USB bus powered, meaning no
additional power supply cable is needed, the same USB connection to your computer
powers the digital film scanner. The Adesso Film Scanner is extremely user-friendly,
just press the one-touch button and film photographs are instantly scanned and on
your computer screen in high quality 1800 DPI images. The Adesso Film Scanner is
also lightweight and portable so you can use anywhere. Sharing your film photo-
graphs digitally is only a click away, start enjoying with family and friends today!
A
(1) Adesso EZScan 1000
Film Scanner
B
(1) Filmstrip Holder
C
(1) Slide Holder
D
Mini USB Cable
E
Quick Start Guide
F
Software CD
QuickGuide
English
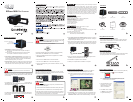
Scanner User Interface
1. LED Indicator: Indicates the scanner status.
On: The scanner is connected with the computer and ready for
film scanning.
Off: The scanner is off, either because scanner is disconnected
from computer or because the computer is turned off.
2. Transparency or Negative Scan Button: A simple touch on the
scanner Transparency or Negative Scan Buttons enables you to
conveniently scan the slide or filmstrip on holder, and automatically
save the digital image file on your computer.
3. Dust Cover Slot: Insert the film holder into the scanner through dust
cover slot. The film holder can be inserted from either side. The film
holder will index at each frame using the notches on its side rails.
LED Indicator
Dust Cover Slot
Transparency Scan Button
Negative Scan Button
EZScan 1000
Film Scanner
FotoLite Setting (Optional)
1. Double click on the FotoLite icon located on the Windows system tray
or right click the FotoLite icon and select “Properties”.
Note: If the FotoLite icon is not in your Windows system tray, go to your
computer’s START menu, then Programs, find EZScan 1000
folder and select FotoLite software.
2. The FotoLite Setting window
will appear. You can apply
customized settings of your
choice or leave default.
3. Click “Done” when complete
or “Default” to return settings
to original default settings.
Converting Film to Digital Files
1. Press either Transparency or Negative scan button on the EZScan
1000 and the FotoLite screen will be displayed as seen below.
Note: FotoLite software must be active and showing in Windows
®
tray so
buttons will launch scanning software (to open software please see
page 11).
scan preview
2. Click “Preview” icon to see image on screen, then once selection area
is set click “Scan” icon. The scanned image(s) will be saved in the
“Destination Folder” selected under “Preference Settings” of FotoLite.
Attention
Before scanning read instructions below for best results.
• Always turn the film emulsion (non-glossy) side facing towards the front
of scanner and glossy side facing the back of the scanner (where USB
cord is located).
• On slide/filmstrip holder edge you can see ‘Mounted Slide Holder’ or
‘Filmstrip Holder’ text, always keep this side facing towards the back of the
scanner (where USB cord located).
• On slide/filmstrip holder edge there is a small label with slide/filmstrip
holder inserting instructions, this label should always face towards
front of scanner.
Attention
Label


Find Your Products By Category
- Computer Equipment
- Portable Media
- Photography
- Car Audio and Video
- TV and Video
- Household Appliance
- Automotive
- Communications
- Kitchen Appliance
- Laundry Appliance
- Home Audio
- Lawn and Garden
- Power Tools
- Musical Instruments & Equipment
- Baby
- Personal Care
- Video Game
- Marine Equipment
- Fitness & Sports
- Outdoor Cooking
- Cell Phone
Please Login
