

0
Owner's of the Alesis Car Amplifier POWER AMPLIFIER gave it a score of 0 out of 5. Here's how the scores stacked up:


Chapter 2: Connections
RA150/300/500 Reference Manual 19
In recent years, expensive audiophile cables of high
current capacity have appeared. These have been
somewhat controversial; some feel the extra expense
produces an audible improvement in sound quality,
while others find no sonic difference between
audiophile cables and other heavy-duty wiring.
While Alesis does not endorse any particular brand
of cable, we suggest that you investigate different
cable types for yourself to discover if they improve
the sound of your particular setup.
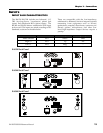
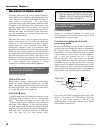
CONNECTING SPEAKER CABLES
TO
BINDING POSTS
The RA150/300/500 connectors are perfect for
studio installations, especially near field monitor
usage, where an effective and reliable connector is
required. In addition, these connectors are very
easy to set up in several different ways.
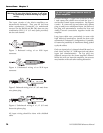
To connect speaker cable to the
connectors:
1. Remove approximately 1/4" of insulation from
the ends of the wires, being careful not to nick
any of the strands.
2. Twist the strands together. Unscrew the
speaker terminals on the amplifier.
3. Feed the strands through the exposed hole in
the binding posts, with the negative connected
to the black terminal and the positive to the red
terminal. Be careful that:
• The connector clamps down on the strands,
not the insulation
• No stray strands contact any part of the
chassis other than the connector.
4. Tighten down the binding posts and check that
the wires can't be pulled out.
Tip: It may be easier to attach the speaker wires
before the amplifier is mounted into a rack.
Using a banana plug:
Standard "dual banana plugs" (such as Pomona type
MDP) should be used if the speaker cable will be
removed from the amplifier often (for example,
when used in a portable PA system).
In this case, simply:
1. Loosen the setscrews in the shaft of the plug
until there is enough room to insert the wires in
each side of the connector. (But be careful that
the setscrew doesn't fall out.)
2. Remove approximately 1/4" of insulation from
the ends of the wires, being careful not to nick
any of the strands.
3. Determine the + and – conductors of the cable
(by markings or moldings on the wire, or by the
color of wire or insulation). Push the "-" side
into the opening in the side of the connector
marked "GND" or with a ridge sticking out the
side.
4. Using a small screwdriver, tighten the setscrew
against the wire.
5. Push the other "+" wire through the strain relief
and into the other opening, and tighten it as
well.
When plugging the banana plug into the amplifier,
make sure that:
• The red and black wire nuts in the amplifier
have been screwed down first.
• The side of the banana connector with the
ridge or nub is plugged into the black
connector.
Using a crimp-on connector:
If a crimp lug terminal is used on the speaker wire
and the lug is too small to fit onto the threaded post,
one leg of the terminal may be inserted in the hole
in the post. As with wire connections, make certain
that the terminal is snugly attached by tightening
the plastic insulator nut.


Find Your Products By Category
- Computer Equipment
- Portable Media
- Photography
- Car Audio and Video
- TV and Video
- Household Appliance
- Automotive
- Communications
- Kitchen Appliance
- Laundry Appliance
- Home Audio
- Lawn and Garden
- Power Tools
- Musical Instruments & Equipment
- Baby
- Personal Care
- Video Game
- Marine Equipment
- Fitness & Sports
- Outdoor Cooking
- Cell Phone
Please Login
