
3.0
Owner's of the AMX Universal Remote MIO R-1 AUDIO gave it a score of 3.0 out of 5. Here's how the scores stacked up:
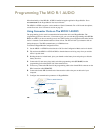
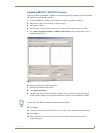


MIO R-1 AUDIO Setup
3
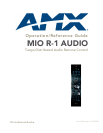
MIO R-1 AUDIO
MIO R-1 AUDIO Setup
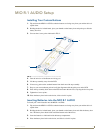
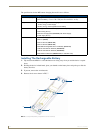
Installing Your Custom Buttons
1. Flip and turn the MIO R-1 AUDIO so that the buttons are facing away from you and the device is
upside down.
2. Holding the device in both hands, place your thumbs on the battery door and push up to slide the
battery door free.
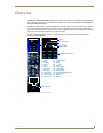
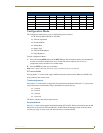
3. Unscrew the 6 screw points indicated in FIG. 2.
4. Turn the unit over so the buttons are facing you.
5. Lift the top assembly away from the PCB.
6. If necessary, push out the standard buttons from the front of the top assembly.
7. Drop on your custom button pad and verify the alignment with the guide posts on the PCB.
8. Place the top assembly back down on the PCB and return the unit over, exposing the 6 screw points.
9. Tighten the 6 screw points.
10. Place the battery door back on the device, slide to lock it in place.
Inserting Batteries into the MIO R-1 AUDIO
To install your 4 AAA batteries into the MIO R-1 AUDIO:
1. Flip and turn the MIO R-1 AUDIO so that the buttons are facing away from you and the device is
upside down.
2. Holding the device in both hands, place your thumbs on the battery door and slide the battery door
free. The battery door should slide toward the bottom end of the device.
3. Insert the batteries as indicated inside the battery compartment.
4. Place the battery door back on the device, and slide it to lock it in place.
FIG. 2 6 screwpoints (battery compartment cover removed)
1
2
3
4
5
6


Find Your Products By Category
- Computer Equipment
- Portable Media
- Photography
- Car Audio and Video
- TV and Video
- Household Appliance
- Automotive
- Communications
- Kitchen Appliance
- Laundry Appliance
- Home Audio
- Lawn and Garden
- Power Tools
- Musical Instruments & Equipment
- Baby
- Personal Care
- Video Game
- Marine Equipment
- Fitness & Sports
- Outdoor Cooking
- Cell Phone
Please Login
