

0
Owner's of the Aroma Coffeemaker Aroma Digital Electric Kettle gave it a score of 0 out of 5. Here's how the scores stacked up:

4
USING YOUR ELECTRIC KETTLE
COMO USAR SU APARATO
4
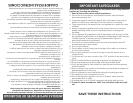
Before using for the first time, it is recommended to clean the interior of
the kettle thoroughly. Please follow the procedure below before using
the kettle:
1. Remove all packing materials and ensure that the kettle has been
received in good condition.
2. Taking care to keep the electrical components on the exterior of the
kettle dry, wipe out the interior of the kettle with a damp, soapy cloth.
If your hand will not fit inside the kettle, swish warm, soapy water
around in the interior of the kettle with the lid closed.
3. Rinse out the inside of the kettle thoroughly with water.
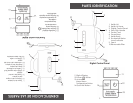
4. Remove the decalcification filter (see “Removing & Inserting the
Filter” on page 7 for instructions). Wash filter in warm, soapy water.
Rinse and dry thoroughly before placing back in the kettle.
5. With a damp cloth, gently wipe off the exterior of the kettle. Do not
wipe off electrical components as this may cause damage to the
kettle.
6. Dry all parts completely.
7. It is also recommended to run your kettle through at least one boiling
cycle before using it to consume beverages. Following the instructions
in “To Boil Water” below, boil one kettle of water. When water has
boiled, pour it out and rinse the inside of the kettle once more. Your
kettle is now ready for use.
Before First Use:
NOTE:
•Do not use abrasive cleaners or scouring pads.
•Do not immerse the kettle body or power base in water at any time.
Antes de usarse por primera vez, se recomienda limpiar muy bien el
interior de la tetera. Por favor siga el procedimiento de abajo antes de
usar la tetera:
1. Retire todo el material de empaque y asegúrese de haber recibido el
producto en buenas condiciones.
2. Teniendo cuidado de que los componentes eléctricos en el exterior de la
tetera se mantengan secos, limpie el interior de la tetera con un paño
húmedo con agua y jabón. Si su mano no cabe en la tetera, coloque agua
tibia con jabón en el interior de la tetera y agítela con la tapa cerrada.
3. Enjuague bien el interior de la tetera con agua.
4. Retire el filtro de descalcificación (vea “Cómo retirar e insertar el filtro” de la
página 7 con las instrucciones). Lave el filtro con agua tibia con jabón.
Enjuáguelo y séquelo bien antes de colocarlo de nuevo en la unidad.
5. Con un paño húmedo, limpie con cuidado el exterior de la tetera. No limpie
los componentes eléctricos. Esto puede causar daños a la unidad.
6. Seque todas las partes por completo.
7. También se recomienda que opere su tetera durante un ciclo de hervir
completo antes de usar el agua para consumir bebidas.
Siguiendo las instrucciones de abajo, hierva una tetera de agua. Cuando el
agua haya hervido, deséchela y enjuague el interior de la tetera una vez
más. Su tetera ahora está lista.
Antes de primer uso:
NOTA:
• No use limpiadores abrasivos o estropajos.
• No sumerja el cuerpo de la tetera o la base de poder en agua en
cualquier momento.
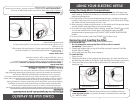
To Boil Water:
1. Place the power base on a sturdy, level and heat-resistant surface.
2. Make sure that the removable filter is properly inserted. See “Removing
and Inserting the Filter” on page 7 for instructions on inserting the filter.
3. Open the kettle lid and fill with water through the lid opening. Do not
fill past the “MAX” line on the water level indicator. Use distilled water
when possible for best taste and to minimize mineral build-up in the
kettle.
NOTE:
•Never fill the kettle with any liquid other than water.
4. Close the lid, ensuring it locks securely into place.
CONTINUED ON NEXT PAGE
Para hervir agua:
1. Coloque la base de poder sobre una superficie sólida y resistente al calor.
2. Cerciórese de que el filtro desmontable esté debidamente insertado. Vaya a
la página 7 “Cómo retirar e insertar el filtro.”
3. Abra la tapa de la tetera y llénela de agua a través de la apertura de la
tapa. No lo llene mas de donde está la línea indicadora “MAX” De ser posible
use agua destilada para mejorar el sabor y para evitar la acumulación de
minerales.
NOTA:
• Nunca llene la tetera con ningún líquido que no sea agua.
4. Cierre la tapa y asegúrese de que está atrancada.
5. Asegúrese de que tanto la tetera como la base de poder estén totalmente
secos y colocados sobre una base plana y sólida para posteriormente situar la
tetera en la base de poder y enchufar el cable en el toma corrientes del muro.
CONTINÚA EN LA PÁGINA SIGUIENTE


Find Your Products By Category
- Computer Equipment
- Portable Media
- Photography
- Car Audio and Video
- TV and Video
- Household Appliance
- Automotive
- Communications
- Kitchen Appliance
- Laundry Appliance
- Home Audio
- Lawn and Garden
- Power Tools
- Musical Instruments & Equipment
- Baby
- Personal Care
- Video Game
- Marine Equipment
- Fitness & Sports
- Outdoor Cooking
- Cell Phone
Please Login
