
0
Owner's of the Atlas Sound Car Amplifier AA-ML Optional Mic/Line Input Module For AA Series gave it a score of 0 out of 5. Here's how the scores stacked up:
1/1
AtlasSound.com
TELEPHONE: (800) 876-3333
FAX (800) 765-3435
©2012 Atlas Sound L.P. All rights reserved. Atlas Sound is a trademark of Atlas Sound L.P. All other trademarks are the property of their respective owners. All specs are subject to change without notice. ATS004329 RevA 5/12
1601 JACK MCKAY BLVD.
ENNIS, TEXAS 75119 U.S.A.
AA-ML
Optional Mic/Line Input Module For AA Series Model AA120M
The AA-ML is an accessory input module for the AA120M. When inserted into the AA120M it can used as an additional Line or Mic input. It features
a level control, RCA summing jacks for line level signals, Phoenix style input for mic level signals, defeatable 18V phantom power supply, remote VCA
level control, and a speech filter with high pass 300Hz @ 6dB (only functional in mic position).
Installation
1. Disconnect the amp from the AC power source.
2. Remove cover from Input 6.
3. Select Input 6 Dipswitch #5 setting. Refer to the AA120M owner's manual on page 8 for information on proper setting. For the AA-ML, we
suggest the Mix Bus position.
4. Decide on the function of the module.
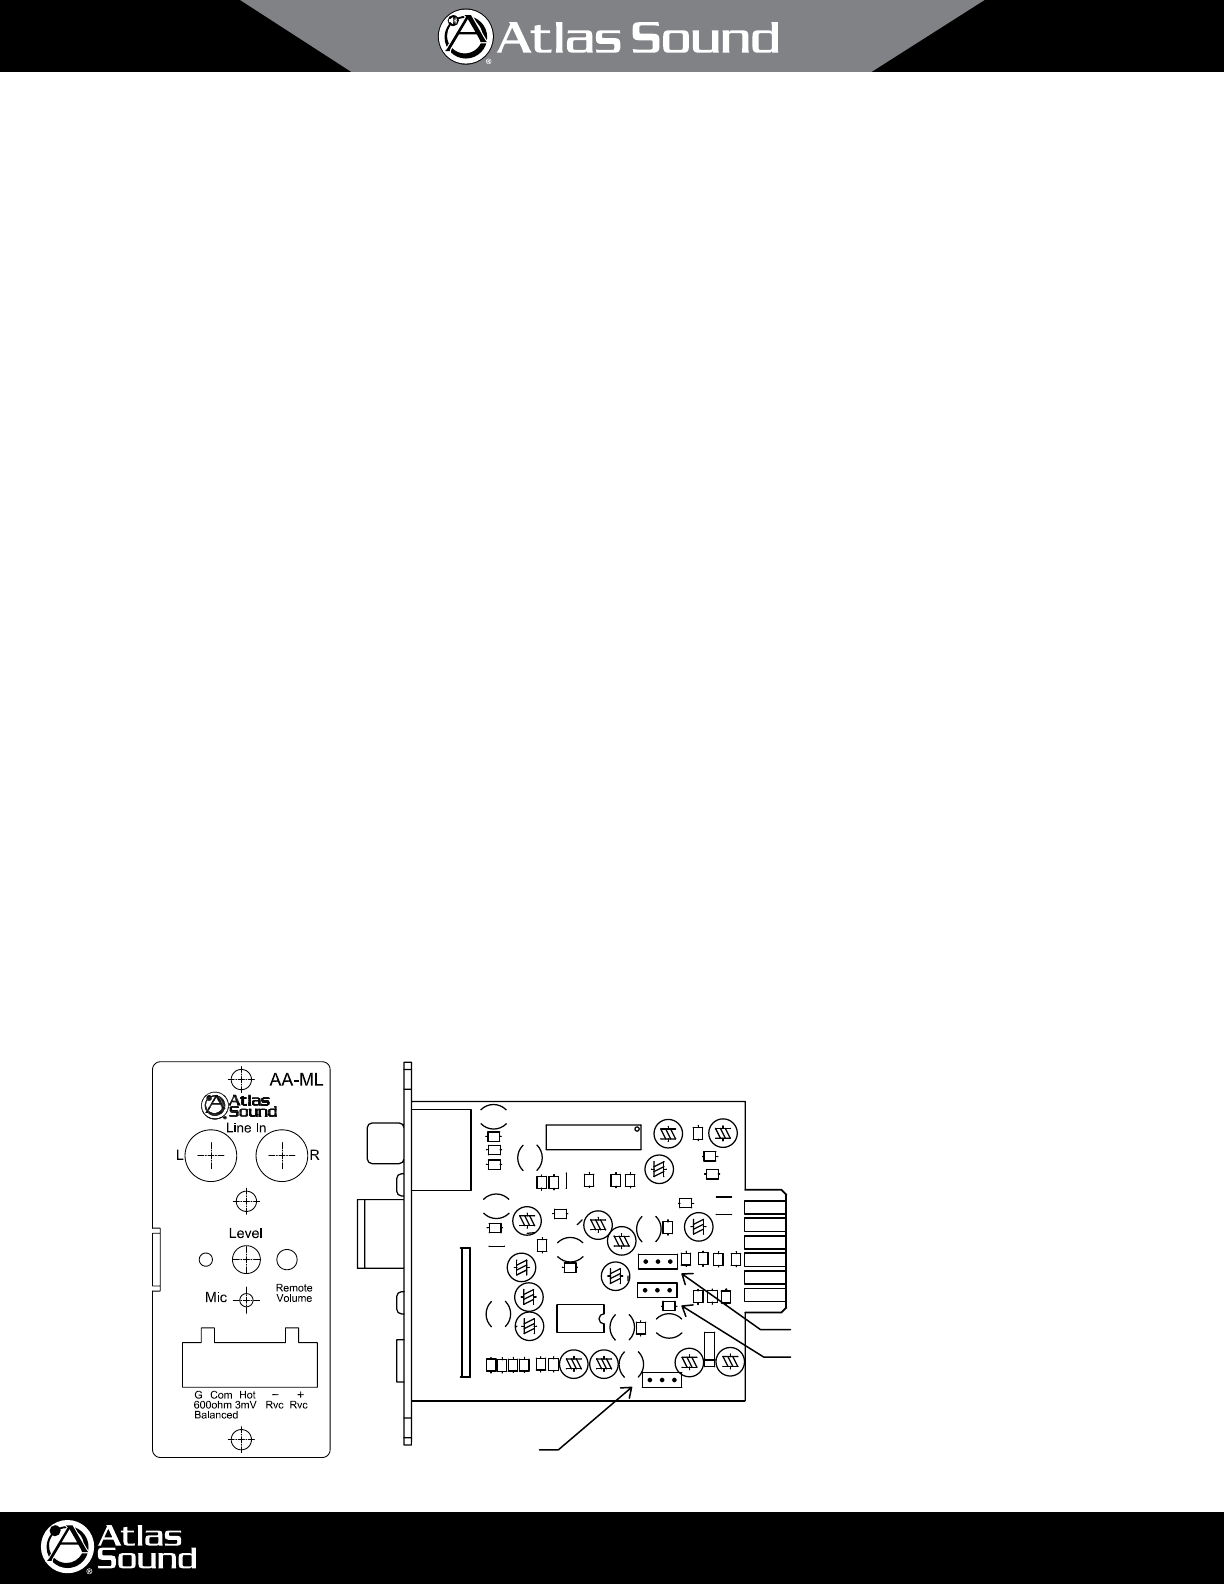
a. For Line input, place jumpers on the AA-ML to the "AUX" pins (see drawing below). Set mic phantom pins to "OFF" and speech filter pins to "OFF".
b. For Mic input, place jumpers on the AA-ML to the "Mic" pins (see drawing below). Decide if you need phantom power for the mic and set
the jumper accordingly. Decide if you need speech filter and set the jumper accordingly. Note: Speech filter only affects mic input.
5. Insert module into card slot. Secure with two screws.
6. Adjust module output level to Input 6. You will need to calibrate the module level, input 6 level, and master level for proper operation.
7. Remote Level Operation can be accomplished by using the AAVC-10K accessory. Connect the 2 wires of the AAVC-10K to the Phoenix
connector on the amp labeled VCA. Note: There is no polarity to the wiring.
8. Refer to the owner’s manual of the amplifier and the AAVC-10K instructions for proper settings.
Specifications:
Microphone Input: 600Ω Balanced
Sensitivity: 3mV
Line Input: 10KΩ Unbalanced
Sensitivity: 300mV
Microphone/Line Switch: (PCB Jumper)
Mic Input Phantom Power: +18(PCB Jumper)
Mic Low-Cut Filter: -10dB at 100Hz (PCB Jumper)
Output Level Control: Front Panel Screwdriver Adjust
Remote Volume Control Mic and Line: 10KΩ
Terminations: Mic Input = Phoenix terminals, Remote Volume = Phoenix terminals, Line/AUX = Dual RCA Summing Jacks
Illustration 1: Jumper Locations
LEVEL
AA-ML
COMHOT
_
LINE IN
LR
+
G
MIC REM
VOL
MIC PHANTOM
OFFON
SPEECH FILTER
OFFON
AUX
MIC
AA-ML
C10
C11
C13
C14
C18
C2
C20
C21
C25
C3
C4
C5
C6
C8
C1
C12
C15
C16
C17
C19
C23
C7
C9
J1
D1
SW1
SW2
SW3
U1
J3
R1
R10
R14
R15
R16
R17
R18
R2
R20
R21
R22
R24
R25
R26
R27
R28
R3
R32
R33
R34
R4
R5
R6
R7
R8
R9
U2
C22
R12
R11
R31
R29
R30
R13
R19
JP3
JP2
JP4
JP5
JP1
MIC PHANTOM
SPEECH FILTER
LINE/MIC SELECT
Mic Phatntom
LINE/MIC Select
Speech Filter


Find Your Products By Category
- Computer Equipment
- Portable Media
- Photography
- Car Audio and Video
- TV and Video
- Household Appliance
- Automotive
- Communications
- Kitchen Appliance
- Laundry Appliance
- Home Audio
- Lawn and Garden
- Power Tools
- Musical Instruments & Equipment
- Baby
- Personal Care
- Video Game
- Marine Equipment
- Fitness & Sports
- Outdoor Cooking
- Cell Phone
Please Login
