
3.4
Owner's of the AT&T Telephone 1856 gave it a score of 3.4 out of 5. Here's how the scores stacked up:
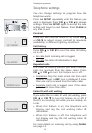

Getting started
4
5
2
1
3
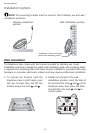
Telephone base installation
NOTES:
• Use only the power adapter supplied with this product or equivalent. To order a
replacement power adapter, visit our website at www.telephones.att.com,
or call 1 (800) 222-3111. In Canada, dial 1 (866) 288-4268.
• Be sure to use an electrical outlet not controlled by a wall switch.
• The power adapter is intended to be correctly oriented in a vertical or floor
mount position. The prongs are not designed to hold the plug in place if it is
plugged into a ceiling or under-the-table/cabinet outlet.
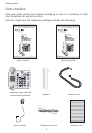
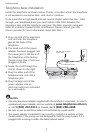
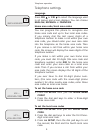
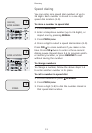
Install the telephone as shown below. Choose a location where the telephone
is not exposed to excessive heat, cold, dust or moisture.
If you subscribe to high-speed Internet service (digital subscriber line - DSL)
through your telephone lines, you must install a DSL filter between the
telephone base and the telephone wall jack. The filter prevents noise and
caller ID problems caused by DSL interference. Please contact your DSL
service provider for more information about DSL filters.
5
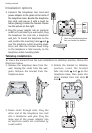
1. Plug one end of the telephone
line cord into the telephone
jack at the back of the
telephone.
2. The small end of the power
adapter has been plugged into
the power jack in the back of
the telephone at the factory.
Double check that it has been
plugged in firmly.
3. Route the cord through the
slot as shown to the right.
4. Plug the other end of the
telephone line cord into a
telephone jack.
5. Plug the large end of the
power adapter into an
electrical outlet not controlled
by a wall switch.
DSL filter (not included)
for DSL users.
Telephone line cord


Find Your Products By Category
- Computer Equipment
- Portable Media
- Photography
- Car Audio and Video
- TV and Video
- Household Appliance
- Automotive
- Communications
- Kitchen Appliance
- Laundry Appliance
- Home Audio
- Lawn and Garden
- Power Tools
- Musical Instruments & Equipment
- Baby
- Personal Care
- Video Game
- Marine Equipment
- Fitness & Sports
- Outdoor Cooking
- Cell Phone
Please Login
