
0
Owner's of the Axis Communications Security Camera 463001 gave it a score of 0 out of 5. Here's how the scores stacked up:

AXIS Q1604-E Network Camera
Video and Audio
- White balance windows
- Action rules
- Settings in uploaded applications
Image Appearance
Increasing the Color level increases the color saturation. The value 100 gives maximum color saturation. The value 0 gives a
black and white image.
The image Brightness can be adjusted in the range 0–100, where a higher value produces a brighter image.
Increasing the Sharpness can increase bandwidth usage. A sharper image might increase image noise especially in low light
conditions. A lower setting reduces image noise, but the whole image will appear less sharp.
The Contrast changes the relative difference between light and dark. It can be adjusted using the slidebar.
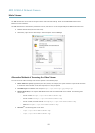
White Balance
White balance is used to make colors in the image appear the same regardless of the color temperature of the light source. The Axis
product can be set to automatically identify the light source and compensate for its color. Alternatively, select the type of light
source from the drop-down list. For a description of each available setting, see the online help
.
The white balance window is enabled for the Automatic and Automatic outdoor options that appear in the White balance drop-down
list. Select one of the options from the drop-down list to set the white balance window properties. Select Automatic to use the
default settings for the Automatic and Automatic outdoor options (in the White balance drop-down list). Select Custom to manually
set a reference window for white balance in the view area.
Wide Dynamic Range
Wide dynamic range (Dynamic Contrast) can improve the exposure when there is a considerable contrast between light and dark
areas in the image. Enable WDR in intense backlight conditions. Disable WDR in low light conditions for optimal exposure.
Note
This setting is only possible when using automatic exposure control.
Exposure Settings
Congure the exposure settings to suit the image quality requirements in relation to lighting, frame rate and bandwidth
considerations.
Exposure value - Click in the bar to ne-tune the exposure.
Exposure control - These settings is used to adapt to the amount of light used. Automatic is the default settings can be used in most
situations. The shutter speed is automatically set to produce optimum image quality. Flicker-free 50 or 60 Hz is used to remove
icker which can be caused by uorescent and other light sources. The Hold current option locks the current exposure settings.
Enable Backlight compensation - Enable this option if a bright spot of light, for example a light bulb, causes other areas in
the image to appear too dark.
Exposure zones - This settings determines which part of the image is used to calculate the exposure. For most situations, the Auto
setting can be used. For particular requirement, select a predened area.
Iris Conguration - See Replacing the lens The Enable automatic iris adjustment option should always be selected, except during
focusing, or when using a xed iris lens.
24


Find Your Products By Category
- Computer Equipment
- Portable Media
- Photography
- Car Audio and Video
- TV and Video
- Household Appliance
- Automotive
- Communications
- Kitchen Appliance
- Laundry Appliance
- Home Audio
- Lawn and Garden
- Power Tools
- Musical Instruments & Equipment
- Baby
- Personal Care
- Video Game
- Marine Equipment
- Fitness & Sports
- Outdoor Cooking
- Cell Phone
Please Login
