
0
Owner's of the Bushnell Binoculars Night Vision gave it a score of 0 out of 5. Here's how the scores stacked up:


54
GETTING STARTED
Installing Batteries
This device operates on two AA batteries. To install, remove the battery compartment cover located on the bottom of the unit.
Insert the batteries into the compartment so that the positive (+) and negative (-) terminals of the batteries match the markings
on the battery cover. Replace the battery cover.
Use and Testing
This device operates on two AA batteries. Make sure it has been installed according to the instructions above.
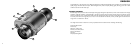
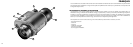
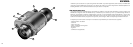
If you wish to test your night vision device in a lighted area, be sure the objective lens cap (1) is covering the objective lens
prior to pressing the “ON” button (2). The objective lens cap has a pinhole opening to admit a small amount of light for
testing purposes.
If testing or using the device in the dark, remove the objective lens cap and activate the device by pushing the “ON”
button.
Your Night Vision device offers a Built-In Infrared Illuminator (3). This allows you to see in complete darkness where no
ambient light source, such as moonlight, is available. To activate, simply press the button located next to the “ON” button
(4).
Direct the device at an object at a distance approximately 100 yards and rotate the eyepiece (5) to give the best quality
image. After the adjusting, do not rotate the eyepiece any longer irrespective of the distance and other conditions.
Direct the device at the subject to be viewed and adjust the final focus by rotating the objective lens (6) until the image quality
is optimal.
The Green LED indicates that the unit is on (7). Always remember to turn the unit off when done. Do not store this device
while the indicator is lit.
This device can be mounted on any tripod with a ¼” tripod socket.
Caution: This device can be used in extreme cold weather. However, when the unit is brought back into a warm environment,
you must wait approximately 5 hours before using the unit again. Damage may occur due to condensation that may have
accumulated on the internal circuitry of the unit.
Spots In The Image
You may see spots in the image. These vary from device to device and are cosmetic blemishes inside the device. These are
normal for Night Vision devices and are NOT a defect.
TROUBLESHOOTING
Scope will not turn on.
Check that the batteries are installed properly. Replace the batteries with new ones. Check the battery contacts to ensure it
is clean and free of corrosion. Check that the power is in the “ON” position.
Image is not focused.
Adjust the focus on the Eyepiece (5). Adjust the Objective Lens(6). If still no improvement, clean the lenses; they may be
foggy or dusty.
Visibility decreases or disappears.
Bright light sources such as headlights may cause visibility to degrade or disappear completely. Turn the Power OFF (2) and
turn the scope away from the light source. The unit will restore itself in 1 or 2 minutes. Conditions such as fog or extremely
dark environments will decrease visibility.
Scope flashes.
The scope may flash when used in a bright environment. It may also flash during the first few seconds of use in dark
environments.


Find Your Products By Category
- Computer Equipment
- Portable Media
- Photography
- Car Audio and Video
- TV and Video
- Household Appliance
- Automotive
- Communications
- Kitchen Appliance
- Laundry Appliance
- Home Audio
- Lawn and Garden
- Power Tools
- Musical Instruments & Equipment
- Baby
- Personal Care
- Video Game
- Marine Equipment
- Fitness & Sports
- Outdoor Cooking
- Cell Phone
Please Login
