
0
Owner's of the Cisco Systems Riding Toy Cisco Firewall gave it a score of 0 out of 5. Here's how the scores stacked up:

19
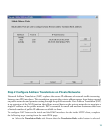
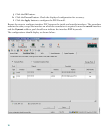
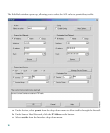
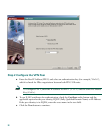
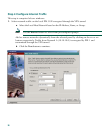
d. Enter the Source Host/Network information (0.0.0.0 for any host or network).
e. Under Destination Host/Network, click the IP Address radio button.
f. Select dmz from the Interface drop-down menu.
g. Enter 30.30.30.30 in the IP address box.
h. Select 255.255.255.255 from the Mask drop-down menu.
Note Alternatively, you can select the Hosts/Networks in both cases by clicking on the
respective Browse buttons.
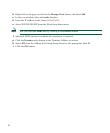
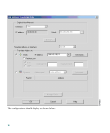
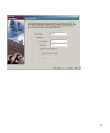
Select the type of traffic that you would permit:
Note HTTP traffic is always directed from any TCP source port number toward a fixed destination
TCP port number 80.
i. Select the TCP radio button, under Protocol and Service.
j. Select “=” (equal to) from the Service drop-down menu under Source Port.
k. Scroll through the options, and select Any.
l. Select “=” (equal to) from the Service drop-down menu under Destination Port.
m. Scroll through the options, and select HTTP.
n. Click the OK
button.
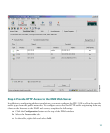
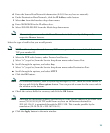
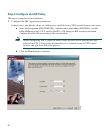
Note For additional features, such as system log messages by ACL, check the radio button at
the top and click the More options button. You can provide a name for the access rule in
the window at the bottom.
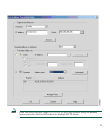
o. Check the various fields for accuracy and click the OK
button.
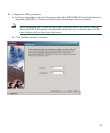
Note Although the destination address specified above is the private address of the DMZ web
server (30.30.30.30), HTTP traffic from any host on the Internet destined for
209.165.156.11 is permitted through the PIX 515E. This is made possible by the
translation (30.30.30.30 = 209.165.156.11).
p. Click the Apply
button in the main window.


Find Your Products By Category
- Computer Equipment
- Portable Media
- Photography
- Car Audio and Video
- TV and Video
- Household Appliance
- Automotive
- Communications
- Kitchen Appliance
- Laundry Appliance
- Home Audio
- Lawn and Garden
- Power Tools
- Musical Instruments & Equipment
- Baby
- Personal Care
- Video Game
- Marine Equipment
- Fitness & Sports
- Outdoor Cooking
- Cell Phone
Please Login
