

0
Owner's of the Humminbird Fish Finder 409010-1 gave it a score of 0 out of 5. Here's how the scores stacked up:

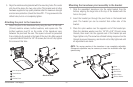
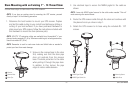
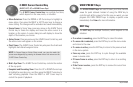
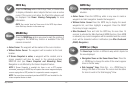


3. The GPS receiver has two wire routing notches. Use the cable notch
closest to the intended cable route.
4. With the cable routed, position the GPS receiver in the planned
mounting location and mark the mounting holes with a pencil or
punch.
5. Move the GPS receiver to the side and drill the two 9/64" (3.5 mm)
pilot holes.
6. Align the GPS receiver's screw holes over the pilot screw holes and
attach with the #8 - 1 1/4" Phillips head screws. Hand tighten only!
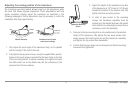
Finish Routing the Cable and
Check GPS Receiver Operation
After installing a GPS receiver, you should perform the following procedure
to finish routing the GPS cable to the control head and to check to make sure
that the control head is working correctly.
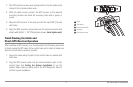
1. Secure the cable along its path to the control head as needed with
cable ties.
2. Plug the GPS receiver cable into the Communications port on the
control head. See Testing the System Installation to use the
System Status start-up option and/or the GPS Diagnostic View to
confirm a good installation.
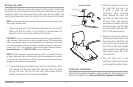
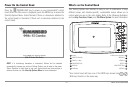
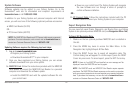
Power
1
Temp/Speed
2
Communications/GPS
3
Transducer
4
Cable Collector Insert
5
1 2
3 4
5
37
GPS- Route Cable & Test Operation


Find Your Products By Category
- Computer Equipment
- Portable Media
- Photography
- Car Audio and Video
- TV and Video
- Household Appliance
- Automotive
- Communications
- Kitchen Appliance
- Laundry Appliance
- Home Audio
- Lawn and Garden
- Power Tools
- Musical Instruments & Equipment
- Baby
- Personal Care
- Video Game
- Marine Equipment
- Fitness & Sports
- Outdoor Cooking
- Cell Phone
Please Login
