
5.0
Owner's of the Linksys Network Router Wireless-G Broadband Router gave it a score of 5.0 out of 5. Here's how the scores stacked up:


48
Chapter 6: Configuring the Wireless-G Broadband Router
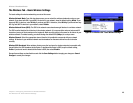
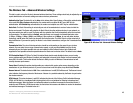
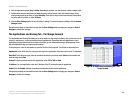
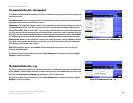
The Access Restrictions Tab - Internet Access
Wireless-G Broadband Router
Figure 6-28: Access Restrictions Tab - Internet Access
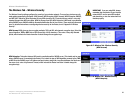
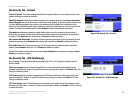
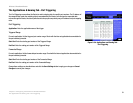
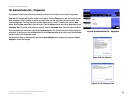
Figure 6-29: Internet Policy Summary
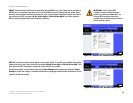
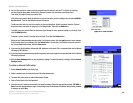
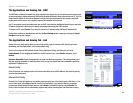
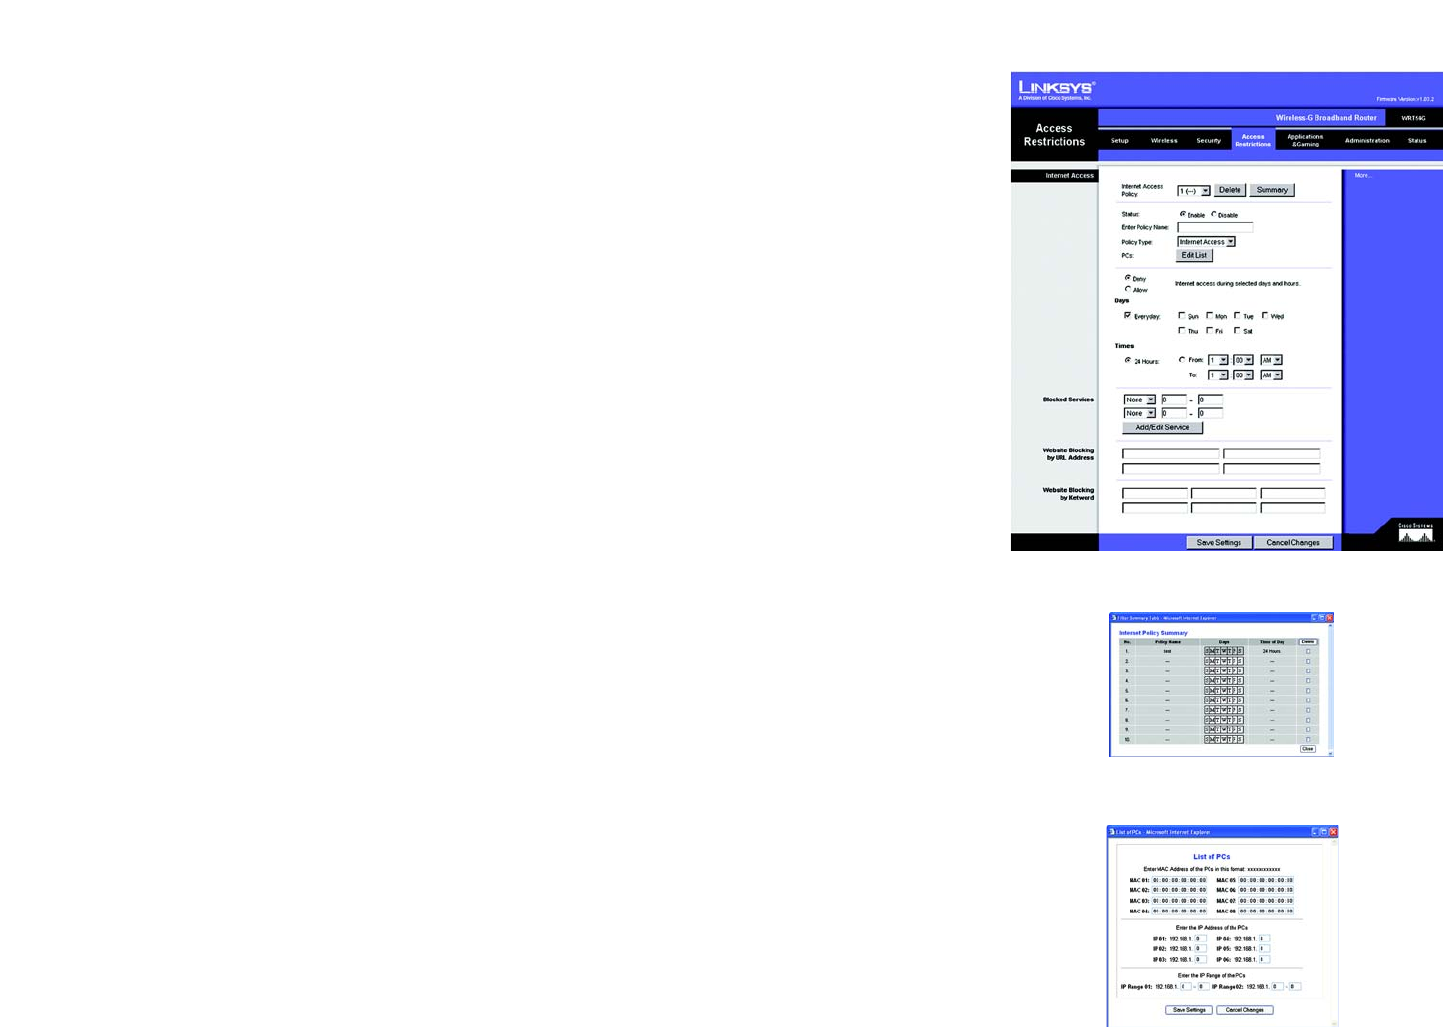
Figure 6-30: List of PCs
Change these settings as described here and click the Save Settings button to apply your changes or Cancel
Changes to cancel your changes.
The Access Restrictions Tab - Internet Access
The Internet Access screen allows you to block or allow specific kinds of Internet usage and traffic, such as
Internet access, designated services, websites, and inbound traffic during specific days and times.
Internet Access Policy. Access can be managed by a policy. Use the settings on this screen to establish an
access policy (after the Save Settings button is clicked). Selecting a policy from the drop-down menu will
display that policy’s settings. To delete a policy, select that policy’s number and click the Delete button. To view
all the policies, click the Summary button. (Policies can be deleted from the Summary screen by selecting the
policy or policies and clicking the Delete button. To return to the Internet Access tab, click the Close button.)
Status. Policies are disabled by default. To enable a policy, select the policy number from the drop-down menu,
and click the radio button beside Enable.
You can create two kinds of policies, one kind to manage Internet access and another kind to manage inbound
traffic.
To create an Internet Access policy:
1. Select a number from the Internet Access Policy drop-down menu.
2. To enable this policy, click the radio button beside Enable.
3. Enter a Policy Name in the field provided.
4. Select Internet Access as the Policy Type.
5. Click the Edit List button to select which PCs will be affected by the policy. The List of PCs screen will appear.
You can select a PC by MAC Address or IP Address. You can also enter a range of IP Addresses if you want this
policy to affect a group of PCs. After making your changes, click the Save Settings button to apply your
changes or Cancel Changes to cancel your changes. Then click the Close button.
6. Click the appropriate option, Deny or Allow, depending on whether you want to block or allow Internet access
for the PCs you listed on the List of PCs screen.
7. Decide which days and what times you want this policy to be enforced. Select the individual days during
which the policy will be in effect, or select Everyday. Then enter a range of hours and minutes during which
the policy will be in effect, or select 24 Hours.


Find Your Products By Category
- Computer Equipment
- Portable Media
- Photography
- Car Audio and Video
- TV and Video
- Household Appliance
- Automotive
- Communications
- Kitchen Appliance
- Laundry Appliance
- Home Audio
- Lawn and Garden
- Power Tools
- Musical Instruments & Equipment
- Baby
- Personal Care
- Video Game
- Marine Equipment
- Fitness & Sports
- Outdoor Cooking
- Cell Phone
Please Login
