
5.0
Owner's of the Linksys Network Router Wireless-G Broadband Router gave it a score of 5.0 out of 5. Here's how the scores stacked up:


50
Chapter 6: Configuring the Wireless-G Broadband Router
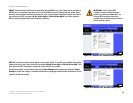
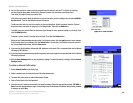
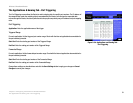
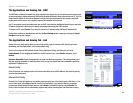
The Applications and Gaming Tab - Port Range Forward
Wireless-G Broadband Router
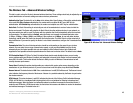
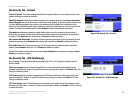
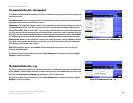
6. Click the appropriate option, Deny or Allow, depending on whether you want to block or allow network traffic.
7. Decide which days and what times you want this policy to be enforced. Select the individual days during
which the policy will be in effect, or select Everyday. Then enter a range of hours and minutes during which
the policy will be in effect, or select 24 Hours.
8. Click the Save Settings button to save the policy’s settings. To cancel the policy’s settings, click the Cancel
Changes button.
Change these settings as described here and click the Save Settings button to apply your changes or Cancel
Changes to cancel your changes.
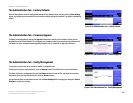
The Applications and Gaming Tab - Port Range Forward
The Applications and Gaming Tab allows you to set up public services on your network, such as web servers, ftp
servers, e-mail servers, or other specialized Internet applications. (Specialized Internet applications are any
applications that use Internet access to perform functions such as videoconferencing or online gaming. Some
Internet applications may not require any forwarding.)
To forward a port, enter the information on each line for the criteria required. The criteria are described here.
Application. In this field, enter the name you wish to give the application. Each name can be up to 12 characters.
Start/End. This is the port range. Enter the number that starts the port range under Start and the number that
ends the range under End.
Protocol. Enter the protocol used for this application, either TCP or UDP, or Both.
IP Address. For each application, enter the IP Address of the PC running the specific application.
Enable. Click the Enable checkbox to enable port forwarding for the relevant application.
Change these settings as described here and click the Save Settings button to apply your changes or Cancel
Changes to cancel your changes.
Figure 6-33: Applications and Gaming Tab - Port
Range Forward


Find Your Products By Category
- Computer Equipment
- Portable Media
- Photography
- Car Audio and Video
- TV and Video
- Household Appliance
- Automotive
- Communications
- Kitchen Appliance
- Laundry Appliance
- Home Audio
- Lawn and Garden
- Power Tools
- Musical Instruments & Equipment
- Baby
- Personal Care
- Video Game
- Marine Equipment
- Fitness & Sports
- Outdoor Cooking
- Cell Phone
Please Login
