
0
Owner's of the Kalorik Iron KALORIK gave it a score of 0 out of 5. Here's how the scores stacked up:

Copies of the I/B. Please reproduce them without any
changes except under special instruction from Team
International BELGIUM. The pages must be reproduced and
folded in order to obtain a booklet A5 (+/- 148.5 mm width x
210 mm height). When folding, make sure you keep the good
numbering when you turn the pages of the I/B. Don’t change
the page numbering. Keep the language integrity. Print only
what is inside the frame.
5 STP 30138 - 120501
Assembly page 5/35
Fax +32 2 359 95 50
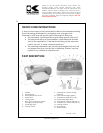
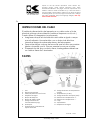
BEFORE USE
Set the appliance on a sturdy work surface. Unlock the locking knob.
FILLING THE WATER TANK
Use preferably demineralized water. If you want to use the steam
function fill the water tank as follows:
1) Unplug the steam press from the outlet and make sure it is cool. If
not, let it cool down.
2) The pressing plate (2) must be lifted to the raised (up) position.
3) Slide the water tank towards the front of the unit. It will not come
completely out so do not force it to do so. Remove the lid of the
water tank (4) by a counter-clockwise turning motion. Using the
water beaker (17), slowly pour the distilled water into the water
tank. Never overfill the water tank. The water level can be seen
through the front of the tank.
4) Be careful to avoid spilling water onto the steam press when
filling.
5) Put the lid back in place using a clockwise turning motion.
6) Slide the water tank back in.
Note: When pressing, unplug the appliance before refilling.
OPERATING INSTRUCTIONS
1. Make sure the locking knob (5) is in the open position (UNLOCK)
allowing free movement of the pressing plate before plugging in
the appliance.
2. Lift the pressing plate (2) to the fully raised (up) position.
3. Plug the appliance into an electric outlet. The red power light (7)
should be blinking.
4. Press the “ON/OFF” button (8) and the red power light (7) will stay
on.
TEMPERATURE SETTINGS
• You can choose the temperature setting according to the cloth
you are pressing (see table below).


Find Your Products By Category
- Computer Equipment
- Portable Media
- Photography
- Car Audio and Video
- TV and Video
- Household Appliance
- Automotive
- Communications
- Kitchen Appliance
- Laundry Appliance
- Home Audio
- Lawn and Garden
- Power Tools
- Musical Instruments & Equipment
- Baby
- Personal Care
- Video Game
- Marine Equipment
- Fitness & Sports
- Outdoor Cooking
- Cell Phone
Please Login
