

3.7
Owner's of the RCA Universal Remote RCR6473 gave it a score of 3.7 out of 5. Here's how the scores stacked up:

6
Troubleshooting
Problem: The remote does not operate your component.
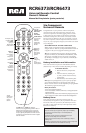
• You must put the remote in the correct mode by pressing the
corresponding component key (TV, SAT•CBL, DVD, DVR•AUX1,
AUDIO, VCR•AUX2) so the remote knows which component you
want to operate.
• Remove any obstacles between the remote and the component.
Make sure to aim the remote at the IR sensor on the component.
• Make sure the batteries are fresh and are properly installed. (See
Battery Installation on page xx.) Replace the batteries with two new
AAA batteries, if necessary. Reprogramming may be required.
• Reset the remote. Remove the batteries, then press and hold
the number 1 key on the remote for several seconds to reset the
microprocessor inside the remote. Release the number 1 key,
reinstall the batteries, and press the POWER key. If the LED lights
up, reprogram the remote and try again. If the LED doesn’t light
up, replace the batteries with new ones.
Problem: The remote can’t be programmed to operate
your component.
• If you are testing the remote after you have entered the code, you may
be too far away from the component or at a wrong angle. This remote
uses IR (infrared) technology to communicate with components. The
remote sends the code, and the component’s IR sensor reads the code.
Therefore, there must be an unobstructed path between the remote
and the IR sensor on the component. Move closer and make sure you
point the remote at the component (DVD player when programming
the DVD key; TV when programming the TV key; etc.).
• If you’ve used the Direct Entry programming methods to enter the
codes for your brand and the unit is still not functioning properly,
try one of the Code Search methods.
• To control combo units, like TV/VCRs or TV/DVDs, you must
program the individual corresponding component keys to control
each part of the combo unit. Once programmed successfully,
the TV key controls the TV functions, and the VCR•AUX2 or
DVD key controls the VCR or DVD functions. There is a specific
section in the Code Lists for combo units. The codes in this
section should be tried first using Direct Code Entry on the TV
and DVD or VCR•AUX2 keys. If this is unsuccessful, follow the
normal programming methods for both keys.
• Make sure the batteries are fresh and are properly installed.
Problem: The remote doesn’t perform commands properly.
• You must put the remote in the correct mode by pressing the
corresponding component key (TV, SAT•CBL, DVD, DVR•AUX1,
AUDIO, VCR•AUX2) so the remote knows which component you
want to operate.
• Make sure component is “ready” (e.g., DVD player has disc
loaded; VCR has tape loaded, etc.).
• You may have pressed an invalid key for the mode the remote is in.
• If you’re trying to turn on an RCA, GE, or PROSCAN
component, press the component key (TV, SAT•CBL, DVD,
DVR•AUX1, AUDIO, VCR•AUX2) instead of the POWER key.
• If you’re trying to enter a channel number directly, try pressing
the ENTER key after entering the channel number as this is a
requirement of certain models and brands.
• There is a possibility that a programmed code may only be able
to control some of your component features (e.g., only turns a
component on and off). To confirm that the component key is
programmed with the correct code for maximum functionality, test
the component. Attempt to control a variety of the component’s
functions with the remote. If some of the features of your
components do not work, try programming the remote with a
different code in the list using the Direct Code Entry Method,
until you find the code that allows the remote to control the
majority of your component’s functions. Different codes can
provide different levels of functionality.
Problem: The LED does not light when you press a key.
• You may have pressed an invalid key for the mode the remote is
in. You must put the remote in the correct mode by pressing the
corresponding component key (TV, SAT•CBL, DVD, DVR•AUX1,
AUDIO, VCR•AUX2) so the remote knows which component you
want to operate.
• Make sure the batteries are fresh and are properly installed. (See
Battery Installation on page xx.) Replace the batteries with two new
AAA batteries, if necessary. Reprogramming may be required.
Problem: The VCR won’t record.
• Make sure the remote is in VCR•AUX2 Mode.
• Make sure the tape is properly loaded in the VCR.
• Make sure the tape is not write-protected. If the safety tab is
removed the tape is write-protected, and you cannot record onto
that tape.
Problem: The remote will not change channels on
component.
• You must put the remote in the correct mode by pressing the
corresponding component key (TV, SAT•CBL, DVD, DVR•AUX1,
AUDIO, VCR•AUX2) so the remote knows which component you
want to operate.
• Press the ENTER key after you enter a channel number.
• Remove any obstacles between the remote and the component.
Make sure to aim the remote at the IR sensor on the component.
Problem: The component’s menu does not appear on the
TV screen.
• Make sure you have connected your component to your TV
properly and selected the correct input. (See your components’
Owner’s Manuals for proper connection procedures.)
• You must put the remote in the correct mode by pressing the
corresponding component key (TV, SAT•CBL, DVD, DVR•AUX1,
AUDIO, VCR•AUX2) so the remote knows which component you
want to operate.
• Menu access isn’t supported for all brands. If that’s the case, you’ll
need to use your original remote control to access menu functions
for these components.
For more information, please visit www.rcaaccessories.com
Limited Lifetime Warranty
Audiovox Electronics Corporation (the “Company”) warrants to you the
original retail purchaser of this product that should it, under normal use
and conditions, be proven defective in material or workmanship during its
lifetime while you own it, such defect(s) will be repaired or replaced (at the
Company’s option) without charge for parts and repair labor. To obtain repair
or replacement within the terms of this Warranty, the product is to be delivered
with proof of warranty coverage (e.g. dated bill of sale), specification of
defect(s), transportation prepaid, to the Company at the address shown below.
This Warranty does not cover product purchased, serviced or used outside the
United States or Canada. This Warranty is not transferable and does not extend
to costs incurred for installation, removal or reinstallation of the product.
This Warranty does not apply if in the Company’s opinion, the product has
been damaged through alteration, improper installation, mishandling, misuse,
neglect, accident, or the simultaneous use of different battery types (e.g.
alkaline, standard or rechargeable).
THE EXTENT OF THE COMPANY’S LIABILITY UNDER THIS
WARRANTY IS LIMITED TO THE REPAIR OR REPLACEMENT
PROVIDED ABOVE AND, IN NO EVENT, SHALL THE COMPANY’S
LIABILITY EXCEED THE PURCHASE PRICE PAID BY PURCHASER
FOR THE PRODUCT.
This Warranty is in lieu of all other express warranties or liabilities. ANY
IMPLIED WARRANTIES, INCLUDING ANY IMPLIED WARRANTY
OF MERCHANTABILITY OR FITNESS FOR A PARTICULAR
PURPOSE SHALL BE LIMITED TO DURATION OF THIS WARRANTY.
IN NO CASE SHALL THE COMPANY BE LIABLE FOR ANY
CONSEQUENTIAL OR INCIDENTAL DAMAGES WHATSOEVER. No
person or representative is authorized to assume for the Company any liability
other than expressed herein in connection with the sale of this product.
Some states/provinces do not allow limitations on how long an implied
warranty lasts or the exclusion or limitation of incidental or consequential
damage so the above limitations or exclusions may not apply to you. This
Warranty gives you specific legal rights and you may also have other rights,
which vary from state/province to state/province.
U.S.A.: Audiovox Electronics Corporation, 150 Marcus Blvd., Hauppauge,
New York 11788
CANADA: Audiovox Return Center, c/o Genco, 6685 Kennedy Road,
Unit 3, Door 16, Mississauga, Ontario L5T 3A5
Trademark(s) ® Registered
RCR6473 US 00
©2007 Audiovox Accessories Corporation
111 Congressional Blvd., Suite 350
Carmel, IN 46032


Find Your Products By Category
- Computer Equipment
- Portable Media
- Photography
- Car Audio and Video
- TV and Video
- Household Appliance
- Automotive
- Communications
- Kitchen Appliance
- Laundry Appliance
- Home Audio
- Lawn and Garden
- Power Tools
- Musical Instruments & Equipment
- Baby
- Personal Care
- Video Game
- Marine Equipment
- Fitness & Sports
- Outdoor Cooking
- Cell Phone
Please Login
